29 June 2011

cake pops, round 2


A cake pop update...
Making cake pops for the Vail Farmer's Market last week went much better than the previous week.  I made sure my cake balls were really cold before dipping in the warm chocolate so that the cake wouldn't flake off into the chocolate bowl.  
I have found that once you dip the cake into the chocolate, then place onto wax paper to cool and harden, the bottom, or should I say, top...of the pops change into a flat surface.  Apparently, the only way to avoid this is to get a styrofoam block, and stick the cake pop in the styrofoam to let it cool in its original round shape.  Maybe I'll try this new drying technique this week. 


I also had a hard time getting the stick to stick.  Maybe the cake was too cold?  Maybe there was too much frosting in the cake to frosting ratio?  I even dipped the stick in chocolate before putting it into the cake ball but that seemed to make things worse.   This is because the cake got a mind of its own after the chocolate cooled, started oozing and tried to break through the chocolate.  


But, as long as I warned people that the pop was going to fall off the stick, they didn't seem to mind - the red velvet cake pops were the biggest hit!


24 June 2011

cake pops

If you haven't heard of cake pops, then you're missing out on the latest and greatest cake craze to hit the streets of America.  Bakerella, the blogger, is rumored to have started the concept and now she has cake pop cookbooks and a very successful website.  I had to look into the trend because even Starbucks is selling them now.  

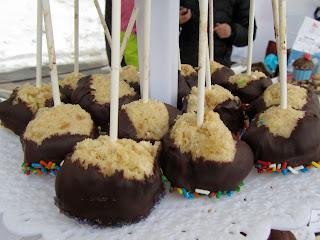
So I did my research and came up with the concept:  smash up your cupcakes, add tons of frosting (but just enough to make them creamy because this is your binding agent) and then roll into golf ball sized circles.  I found that you need to have cold, if not frozen cake to work them into the right shape because when the balls are sticky and your hands are warm it just doesn't work.  Once you get an acceptable shape, you place a lollipop stick into the cake ball and dip in chocolate.  It didn't quite work for me as well as I'd hoped because the cake was crumbling off into the melted chocolate while I was trying to dip them so I ended up with bubbly cake pop surfaces.  

These are cake pops I made for the Snowball Music Festival this past March - I used vanilla cake, cream cheese frosting & dipped them in semi-sweet Ghiradelli chocolate.  They were really good, and stayed frozen in the outdoor 10 degree temps.  But, not nearly perfect.  The latest batch I made last week for my Farmer's Market test run were smaller, totally dipped in chocolate and potentially looked more appetizing.  I didn't take any photos of them so I will post after the weekend with my cake pop progress! 

This is Cassie, my trusty assistant who drives all the way from Aspen to help out the cupcake lady at fun and festive events like this one - free live music & slingin' cake pops - yes please for this Alabama girl! 

I'm really excited for round 2 of cake popping this weekend because even though they were imperfect looking, the crowds at the Vail Farmer's Market ate them up!  (pun intended.)   
I'm looking forward to another successful weekend of cupcake slinging and making my 2 brides happy on their big Saturdays.

16 June 2011

colored coconut

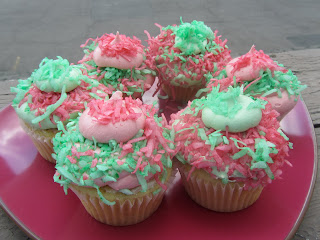
For all of those Easter bakers out there, you may already know the magic of dying coconut to look like grass.  I had not delved into the world of colored coconut until a bridal shower requested pink & green vanilla coconut cupcakes.  There are many methods out there, but the one that I found to be the most effective utilizes my favorite storage container ~ tupperware!  
I placed 4 drops of liquid food coloring on each side of the plastic tupperware, locked the lid in place, and shook it!  Shake it 'til all of the liquid coats the inside of the container.  Then open up the top, place the desired amount of coconut garnish inside the tupperware & shake again.  Viola!  You have any colored coconut you want!  
Be careful not to add too much food coloring from the outset because you can't undo the color.  If you decide it's not dark enough after your first round, carefully add the food coloring to the sides of the tupperware again, avoiding dropping the coloring directly on the coconut as it will absorb instantly.  
Using 4 drops for my dye job, I ended up with bright, Lilly Pulitzer inspired coconut. 


To pair the frosting with the green & pink coconut, I wanted the opposite color of coconut to accent the frosting for more depth.  The pink vanilla buttercream was the base frosting, then a layer of green coconut, then a dollop of pink buttercream & a sprinkle of pink coconut for the top. 


The end product was a little family of pink & green cupcakes - whimsical and yummy!  These cupcakes were for a pink & green bridal shower.  You could use this process for any occasion like Halloween, Easter or a yellow, pink & blue baby shower!


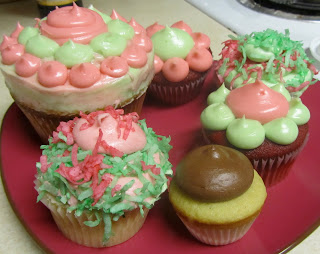
The bridal shower collection was the following:  pink & green velvet (12 o'clock & 4 o'clock), pink & green vanilla coconut (2 o'clock & 8 o'clock), mini cookie dough cupcake - vanilla cupcake filled with half-baked cookie dough, topped with chocolate buttercream (5 o'clock), pink & green texas size lemon zest - vanilla cupcake filled with lemon curd, topped with lemon cream cheese frosting (11 o'clock)

07 June 2011

lavender hydrangea

My college roommate from CU is getting married this summer - lucky for both of us - she chose Vail as her destination location from Chicago.  She is going to have a fun, elegant & floral theme for her wedding cupcakes, made by yours truly.  
Hydrangeas are her theme flower so she requested that I take a look at a few blogs out there to see how to make the cupcakes actually look like hydrangeas.  
A few weeks ago, I happened to have an order for a high school graduate who requested chocolate lavender cupcakes just like she had on vacation in LA.  I had a perfect excuse for a practice run with floral inspired buttercream.  

The trick is going with a 2-toned frosting - I chose light purple & white since the frosting flavor was lavender.  It creates more depth to create the illusion of how a three dimensional flower might look.  Of course you could go with any color scheme to match your theme.  I recommend white as at least 1 of the colors because it acts as a perfect base for the featured color.  Make sure you don't overdo it on the milk when making your buttercream because it needs to be pretty stiff.  In this photo you can see how the frosting loosened with the heat of my hand on the piping bag...


the stiffest frosting is on the 5pm cupcake


A bouquet fit for a bride or an afternoon tea